How to Guide: In-course labs
What is In-course Labs?
In-course Labs is a new curriculum item that enables learners to practice technical skills in real environments called workspaces. These hands-on experiences allow learners to apply course concepts directly, building confidence and job readiness. This guide will help you design engaging labs for your course.
Why Include Labs in Your Course?
In-course Labs enable learners to:
- Practice skills in real workspaces without leaving your course
- Increase job readiness by transferring learned skills to real-world environments
- Engage actively with content, improving retention and learning outcomes
In-course Labs Consists of Three Features:
- Video Instructions: Building on the successful video lecture format, In-course Labs are centered around video instruction.
- Lab Tasks: Structured tasks provide guidance and resources to learners as they practice new skills.
- Technical Workspace: Pre-built environments allow learners to jump directly into practice without setup requirements.
Designing a High-Quality Lab
Decide where to include the In-course Lab.
Identify strategic points in your course where In-course Labs will reinforce key skills and align with learning objectives.
✅ Best Practices:
- Choose the appropriate lab type for your learning objectives:
- Follow-along labs: Step-by-step instruction where you demonstrate and explain processes for learners to replicate
- Guided challenge labs: Broader tasks with partial guidance where learners attempt solutions independently with some structure and resources
- Ensure each In-course Lab directly supports the skills taught in the corresponding lecture
- Connect In-course Labs explicitly to your stated learning objectives
- Design In-course Labs to be device-agnostic, functioning equally well on PC and Mac systems
💡 Examples:
Jupyter Notebook
- Add a Jupyter Notebook follow-along lab after a lecture on data visualization with matplotlib where students create interactive charts.
- Include a guided challenge lab after teaching pandas fundamentals where students clean and analyze a dataset independently.
GenAI
- Add a follow-along lab after a lecture on prompt engineering where students craft and test prompts with a GPT model.
- Place a guided challenge lab after a module on fine-tuning where students create their own specialized AI assistant.
AWS
- Add an AWS follow-along lab after a lecture on cloud fundamentals where students launch and configure their first EC2 instance.
- Include a guided challenge lab in a course section on serverless computing where students build a complete API using AWS Lambda and API Gateway.
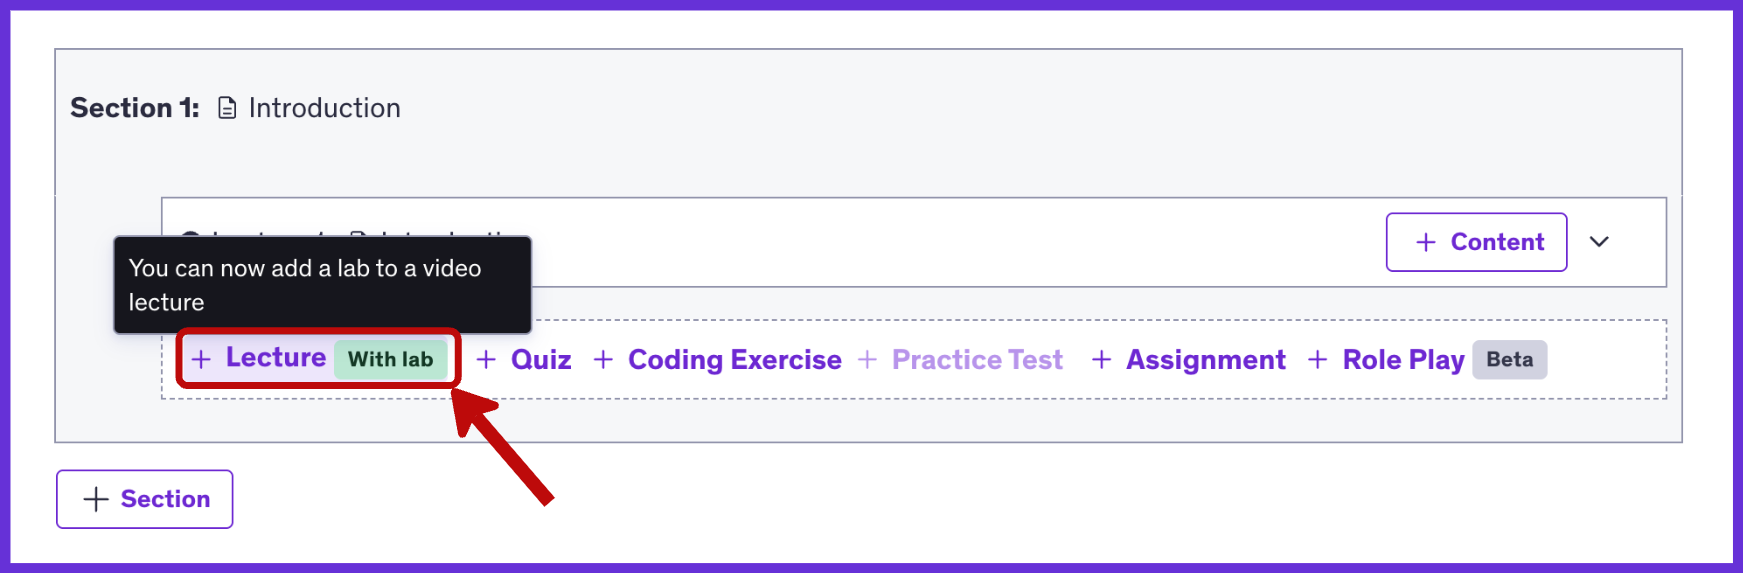
Create a Lecture with Lab
Select the “Lecture with Lab” curriculum item to begin. Create a clear, descriptive title that captures the essence of the lab and highlights the skills learners will practice. This title will appear as the curriculum item within your course content.

✅ Best Practices:
- Create titles that are specific and clearly aligned with learning objectives
- Focus on the primary skill(s) being practiced
- Make titles engaging and relevant to learner goals
💡 Example Lab Titles:
Jupyter Notebook
- Follow-along Lab: “Interactive Data Visualization: Build Dynamic Charts with Matplotlib”
- Guided Challenge Lab: “Data Wrangling Challenge: Clean and Analyze Real-World Datasets with Pandas”
GenAI
- Follow-along Lab: “Mastering Prompt Engineering: Craft Effective GPT Prompts for Precise Outputs”
- Guided Challenge Lab: “Build Your AI Assistant: Fine-Tuning Models for Specialized Tasks”
AWS
- Follow-along Lab: “Launch Your First Cloud Server: Hands-on EC2 Instance Configuration”
- Guided Challenge Lab: “Serverless API Challenge: Building End-to-End Solutions with Lambda and API Gateway”
Upload Your Lab Video
Important: The “Lab” option will only become available after you have uploaded a video to your lecture.
Add your lab video and wait for processing to complete. Then click the “+Lab” button to create a lab and access the Lab Editor.


Edit Your In-course Lab in the Lab Editor
Creating your In-course Lab follows a three-step process:
- Plan Your In-course Lab: Select workspace and upload starter code
- Create Tasks: Structure your lab into discrete task components
- Publish Your In-course Lab: Add context and finalize your lab
Plan Your Lab
Select Lab Workspace:
Choose your In-course Lab vertical and workspace type from the available options.

Workspace Types: Udemy vs Personal Environments
In-course Labs provide Udemy workspaces for Udemy Pro subscribers. Be aware that some learners will use their own personal environments instead.
✅ Best Practices:
- Design In-course Labs to be accessible for all learners, considering the different policies and limitations between Udemy workspaces and personal environments
- Review the technical specifications for Udemy In-course Labs workspaces to ensure a consistent learning experience for all students.
Upload Starter Code:
Provide starter code that will be preloaded in the Udemy workspace for learners.
✅ Best Practices:
- For Jupyter labs, include a zip file containing all necessary ipynb files and data files (e.g., CSVs)
- Remove spaces from your starter code zip file names
- Test your lab to make sure your starter file is loading by previewing your lab
- DO NOT delete the Makefile from the initial zip
- DO NOT include unnecessary files such as __MACOSX, .DS_Store, .git, .gitignore, *.pnp.cjs, pycache, node_modules, or .yarn
Create Tasks and Add Reference Code
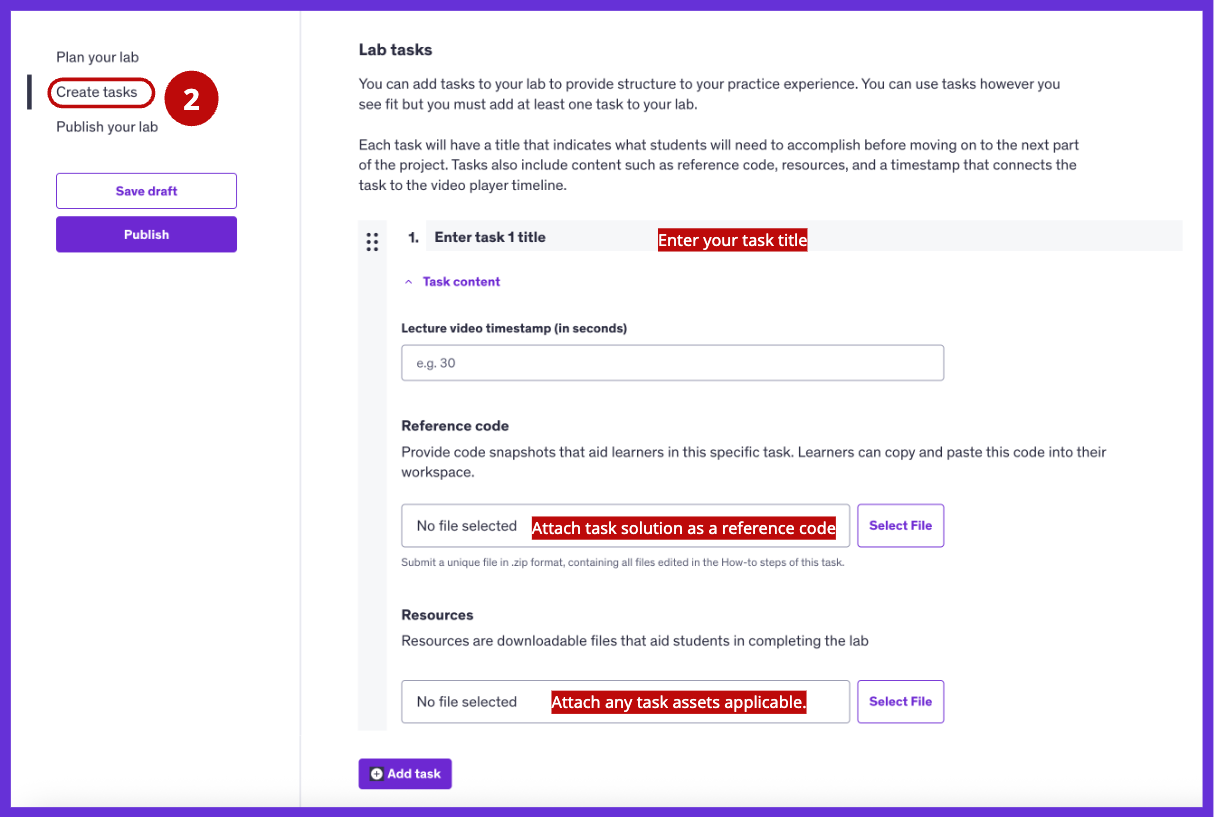
Add Lab Tasks
A lab task represents a logical chunk of steps that contributes to the larger lab goal.
Enter a Task Title:
Each task needs a clear title indicating what learners should accomplish before moving to the next part.
✅ Best Practices:
- Create task titles that specify a concrete outcome for learners to achieve
- Keep descriptions brief (10 words or less) while clearly communicating the task’s purpose
- Provide just enough context for learners to understand the task’s goal
💡 Example Task Titles:
Jupyter Notebook
Follow-along Lab: “Interactive Data Visualization: Build Dynamic Charts with Matplotlib”
- Task 1: “Import and prepare dataset for visualization”
- Task 2: “Create a responsive line chart with interactive features”
- Task 3: “Add customized annotations and styling to your chart”
Guided Challenge Lab: “Data Wrangling Challenge: Clean and Analyze Real-World Datasets with Pandas”
- Task 1: “Load and inspect the messy dataset”
- Task 2: “Handle missing values and outliers”
- Task 3: “Create aggregated summary statistics by category”
GenAI
Follow-along Lab: “Mastering Prompt Engineering: Craft Effective GPT Prompts for Precise Outputs”
- Task 1: “Create baseline prompts for text generation”
- Task 2: “Apply constraint techniques to narrow responses”
- Task 3: “Implement chain-of-thought prompting for complex tasks”
Guided Challenge Lab: “Build Your AI Assistant: Fine-Tuning Models for Specialized Tasks”
- Task 1: “Prepare your training dataset”
- Task 2: “Configure and launch the fine-tuning process”
- Task 3: “Test and evaluate your specialized model”
AWS
Follow-along Lab: “Launch Your First Cloud Server: Hands-on EC2 Instance Configuration”
- Task 1: “Create a secure key pair for server access”
- Task 2: “Launch and configure your EC2 instance”
- Task 3: “Connect to your instance via SSH”
Guided Challenge Lab: “Serverless API Challenge: Building End-to-End Solutions with Lambda and API Gateway”
- Task 1: “Create a Lambda function for data processing”
- Task 2: “Configure API Gateway endpoints”
- Task 3: “Test your serverless API with sample requests”
Enter a Timestamp for the Task:
Specify the exact time (in seconds) where each task begins in your lab video; these timestamps will appear as clickable markers on the video player, helping learners quickly navigate to relevant tasks.

Provide a Solution:
Add “reference code” for each task when applicable. Reference code provides code snapshots that learners can copy/paste into the workspace. They are for your learners to verify their own work. Some use cases might be:
- To check the solution if they are stuck
- To verify their approach if they are uncertain
- To compare approaches after they are complete with their own solution

✅ Best Practices:
- Code Organization and Documentation
- Include detailed comments explaining the reasoning behind implementation choices
- Add a README file with an overview of the solution approach
- Document assumptions made and alternative approaches considered
- Use consistent naming conventions and code structure
- Well-structured code
- Organize solution code into logical sections or modules
- Follow industry best practices for code organization
- Include appropriate error handling
- Demonstrate clean, maintainable coding practices
- Ensure reference files do not include unnecessary system files (e.g., __MACOSX, .DS_Store)
- Add reference files at the top level to avoid unnecessary folder nesting
- For Jupyter labs, capture and upload HTML files from the notebook to include as reference code
Add Task Resources:
Provide assets learners need to use or consult as they attempt the task. Assets are resources that learners might need to utilize as they attempt the task. Examples would be:
- Database files
- Images that should be on a webpage they are designing
- Mockups to reference as they work
- JSON/YAML files they may need to upload

Publish Your In-course Lab
Complete your In-course Lab by adding context for learners:
- Enter the estimated duration of your lab
- Tag relevant topics
- Click “Publish” to finalize your lab
Note: You also need to publish your In-course Lab lecture in order for your learners to access the In-course Lab.

Start Creating Engaging In-course Labs
In-course Labs offer learners valuable opportunities to practice technical skills in realistic environments. By following this guide, you can create meaningful, hands-on experiences that build confidence, develop problem-solving abilities, and enhance job readiness.
Ready to begin? Identify key lectures in your course where In-course Labs would add value, design appropriate activities, and set clear objectives for your learners. With thoughtful planning, your In-course Labs will make learning more engaging, interactive, and impactful.
Ready to create your course? Let's go!
Create a CourseHave questions?

Help and support
Find answers to frequently asked questions and review troubleshooting and how-to articles.

Instructor community
Get support and inspiration from new and experienced instructors.

Trust and safety
Learn about course requirements and policies for instructors and learners.